
Complete Guide to Configure Static IP Address in CentOS

Once the CentOS is installed it is often seen that most of the users try to configure the IP address. In most of the cases, the users try to give a static IP address. CentOS is often configured to receive the IP address from the DHCP server. In the following stages, we will get to know the steps to configure the static IP address in Cent OS. CentOS mainly attempts to make the networking configuration and operation as painless and automatic at the same time. It mainly manages the primary network connection such as the Ethernet, wi-fi and similar other things. Configuration of the files is one of the main step associated with this work.
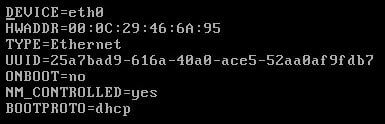
- Most of the files are needed for network configuration that is under /etc/sysconfig/network-scripts. So it is better to open the files with the help of the editor such as nano or vi. In most of the cases, nano is used. Once the user starts using the server that is running under Cent OS it is better to enter the root credentials and get it immediately. Also type the command such as # nano /etc/sysconfig/network-scripts/ifcfg-eth0. The user will soon notice the changes.
- There will be different types of configuration that will be observed. Just have a look at this and soon the user will see the changes. The default configuration will appear like this. Please have a look at it.
- It is now better to change the configuration. In fact, most of the users like to observe these changes. Let’s have a glance at this.
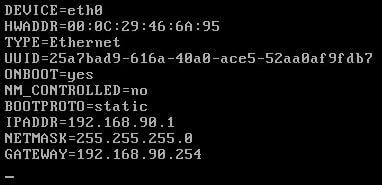
- In the next step, it is better to save the file and save the press Ctrl +x and then press for ultimate confirmation. It is the most vital step in this case.
- After all, this, restart the network services only by issuing the command. There is a specific command in this case like [root@hostname~]# service network restart
- In order to verify the IP address, the user should issue the following command and that is very essential. The command should be [root@hostname~]# ifconfig. The user will notice the following configuration and it is quite important.
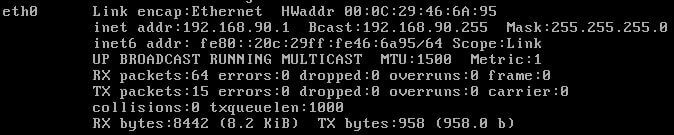
- Once the configuring of the IP address is completed the user should configure the IP address that is stored mainly in a different file. In this step, it must be said that it is very essential to edit and set up the entire thing for Ethernet.
- Once the file is found default enter at least one entry over there. It can be nameserver 4.2.2.2.
- The name of the server can be different and it can mostly vary depending on the network scenario. There are many people who prefer to use www. Google.com. Simply save the file and go straight for the exit mode. The test command can be checked by using the ping command and that is [root@hostname~]# ping www.google.com
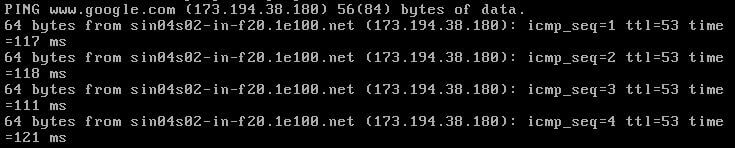
- If the user gets the reply promptly then it simply connotes that the IP address and configuration has been successfully installed. This is indeed a great achievement. The following configuration will make the whole thing absolutely clear.
Thus, the whole thing seems to be quite clear and nice. Most of the people, mainly prefer to use this method for getting the work done in an appropriate way.
There are certain things that the user should keep it in mind.
- Firstly, all the fields are to be made bold and the user has to edit to reflect the networking needs and requirements. If somehow there is more DNS address then it is always advised to add or remove as per the requirement. This is also a very essential step in this case and it should be strictly followed.
- Also, the user has to save and close the file at the same time. For making the changes it is better to issue the command sudo sysetemtl and restart the whole network. The moment the restarting network commences it is best to issue the IP command to see that the IP address has already changed to reflect the configuration properly.
- There are some minor things that should not be ignored in any circumstances. It should always be followed in any situation and circumstances.
- Apart from this, there are ample tutorial sessions that can easily preach the method of doing this work. In most of the cases, people usually follow these steps and they try to maintain the work in a perfect way. Most of the tutorials that are prepared in this case are proved to be very helpful. Even there are many websites that are very prompt in spreading the actual knowledge in carrying out the work efficiently. It has proved to be a great one in this case. As a result, the demand for such websites is slowly increasing day by day.
- In many cases, it has been seen that the said person is working in a data center and as the boss has advised him to carry a CentOS server setup and so the same has to be configured in a running environment. Thus, in such a situation there are certain steps that need to be followed. They are quite related to each other and very helpful at the same time. The values that are suggested have to be adjusted with the said working environment. Only the FNS resolving name servers can be used in some of the networks and as such those IP address mainly belongs to the public name servers from Google.
It is now quite clear from the above discussion that the above-mentioned steps have really proved to be quite helpful for the common man. In the present world, there is a number of means to stay updated. Some of them are very advanced and nice. It simply advises and helps the common man to carry out the work in a simple and easy way. It is also expected that in times to come there will be more such invention in the field of science and technology and it will really help the people associated with this trade.