
The most secure and perfect mode of sending and accessing commands to the router CLI through a proper network connection is known as SSH or Secure Shell.SSH is somehow similar to telnet that sends data in plain text form. In the same way, SSH also uses encryption that will assist to ensure both the confidentiality and integrity of the data. This is a fantastic job that is rendered by them. SSH has mainly two versions by which SSH v2 is an improved form of v1 due to the security holes that are found especially in v1. If SSH is enabled in Cisco Router it will help to support both the version easily.
How to Enable SSH in Cisco IOS Router

Enabling SSH in Cisco IOS Router
The following steps will help the user to understand the whole thing in a much better way. Let’s have a glance at it.
- Prepare the device in the following ways like setup hostname, domain name, username, and passwords namely.
- In the next step preparation of the network is equally important. It will include IP addressing and routing.
- On the other side, generating the RSA key and activating SSH is equally important.
- Lastly applying the SSH transport for the vtys is also a vital one. It must be remembered that in the first time of configuration the user needs to access the router directly by using the console cable.
#1. Preparing the device correctly:
In order to proceed for the preparation step, the user has to name the device and set the domain name equally. In this case, the user has to use the local database for credential purpose. In the same way, it is also mandatory to create at least one username and password for the router because SSH will not work without its assistance. In the following image, the user will get the correct idea.
Router(config)#hostname GeekRtr
GeekRtr(config)#ip domain-name mustbegeek.com
GeekRtr(config)#username admin password letmein123
GeekRtr(config)#username admin privilege 15
GeekRtr(config)#username monitor password letmesee123
GeekRtr(config)#enable password letmeconfig123
#2. Configuration of the network
This step will configure the network in a proper way. It mainly depends upon the network topology, which the user is mainly working with. For this, the user is going to use a simple topology where one interface of the router is connected to the standard Cisco switch with a PC is attached to it. A static IP configuration has been provided to the PC with the help of a router with the help of another IP address. There is also IP management that is assigned to the loopback interface on the router. In fact, in this step network configuration can be done in the right way and so the SSH configuration can be done in the right way.

#3. Generating of the RSA key and activating SSH
In the next step, the RSA key will be generated that will be used by the SSH to encrypt its data. The user needs to specify the size of the key modulus. If the number is higher then the configuration will be stronger. But in most of the cases, it takes a lot of time to generate the key. Many times the user feels or wonders why SSH version shows 1.99 on the output instead of version 1 or version 2. The only answer for that is by default Cisco supports both the SSH v1 and v2.
GeekRtr(config)#crypto key generate RSA
The name for the keys will be: GeekRtr.mustbegeek.com
Choose the size of the key modulus in the range of 360 to 2048 for your
General Purpose Keys. Choosing a key modulus greater than 512 may take
a few minutes.
How many bits in the modulus [512]: 1024
% Generating 1024 bit RSA keys, keys will be non-exportable…[OK]
#4. Application of SSH transport for the vtys
In the previous step, it is noticed that SSH has been activated. Now there are mainly two steps that are left in this case. The first one is the application of SSH on the virtual terminal line and the second one is the setting of login authentication method in order to use a local username that has been created.
The command line vty 04 is mainly used to specify the maximum number of virtual terminal sessions that are allowed on the router. The command transport input ssh will apply on to the virtual terminal. It also disables other methods like telnet too. In fact, SSH is the only reliable method where one can access the router.
On the other side, the command login local is used to authenticate any type of login attempt against the local username and database. Also, remember that there is two local usernames.
With the help of this configuration, one can successfully enable SSH on CISCO IOS Router.
Verification process:
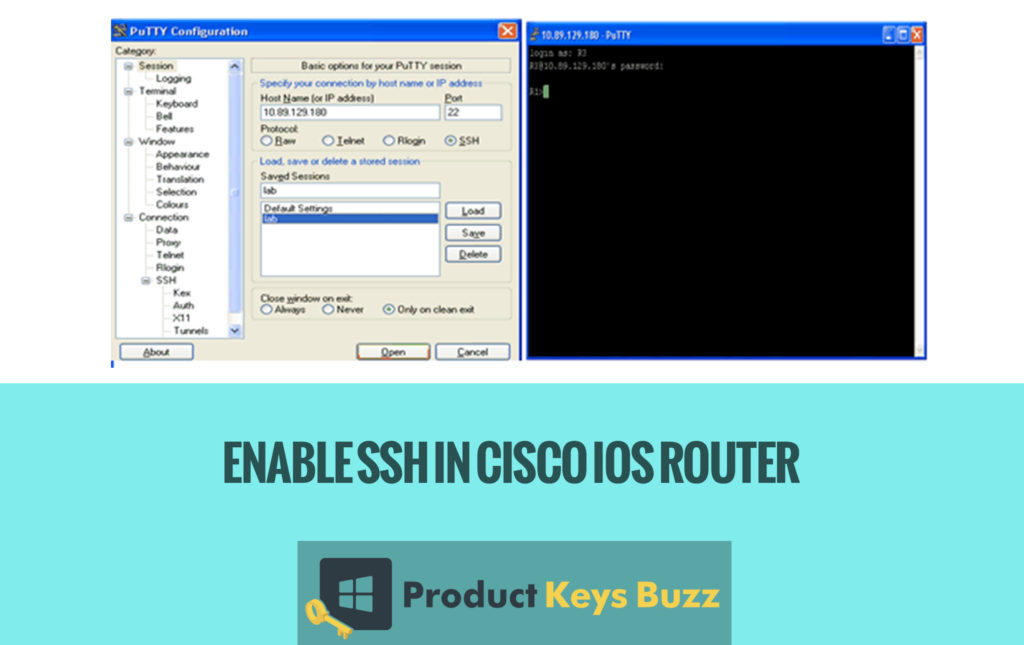
The most important part is the verification process. It is the time when one can access to the router using the SSH client software on the PC. In this case, the user is using the PuTTY and also specified the router loopback address. 1.1.1.1 mainly as the destination and the SSH as the connection type.
Management of the SSH session:
On the other side, most of the users sometimes want to know who is currently logged into our router. In most of the cases, the username admin has a session number that starts from 0 and the username monitor has a session number as 1. And if it is noticed that the asterisk (*) mark on the admin username that indicates this command is executed from admin session. The user can easily disconnect any session from the privileged EXEC mode by issuing the command clear line vty mainly where x is the session number. In this case, the user wants to disconnect the session from the username monitor and thus the user will command clear line vty 1. The user straightly pressed the enter key for confirmation and received the OK as a result. Further, the user has successfully kicked out the username monitor from the SSH session.
GeekRtr#clear line vty 1
[confirm]
[OK]
The user can press the enter key whenever asked for the confirmation. If they receive the confirmation it is better to press OK.
Now, it can be seen that advanced technologies have been able to do the whole work successfully. Even a few days earlier the work was quite tough but now the whole thing has been much simpler and less complicated. Most of the IT professionals are highly benefitted out of this. They are applying the same in various projects and work. So, it is really a great invention in the high technological world.
Table of Contents