There are a lot of problems that could be faced if you are using Windows 10. Out of all, “Windows could not automatically detect network’s proxy settings” is the most common one. Here are a few of the methods that could be used in order to solve this issue.
How to Fix “Windows could not automatically detect network’s proxy settings”
Solution 1: Checking the proxy server settings
The first solution is to check the proxy server of your system. This is a very easy and quick process and could be done by anyone. Here are the steps that will help you in doing so.
- The first thing that you need to do is to disable the proxy server on the internet explorer.
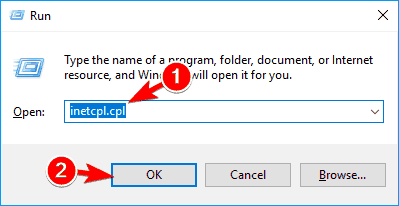
- After that, you need to press windows key and press key R. this will open up run dialogue on your computer. Once it is there, type inetcpl.cpl and then you need to press enter.
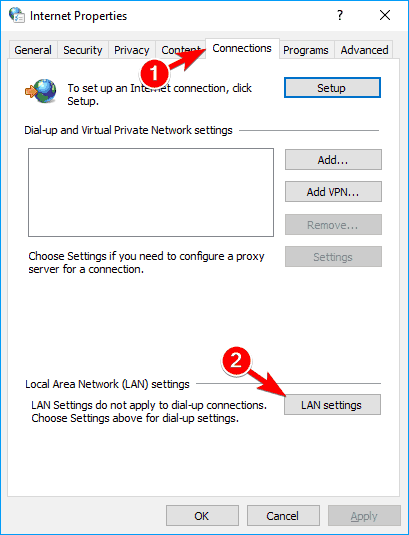
- Once the previous step is completed, you need to click on the connections tab. There will be a lot of options on your screen after that, you need to select the LAN settings button.
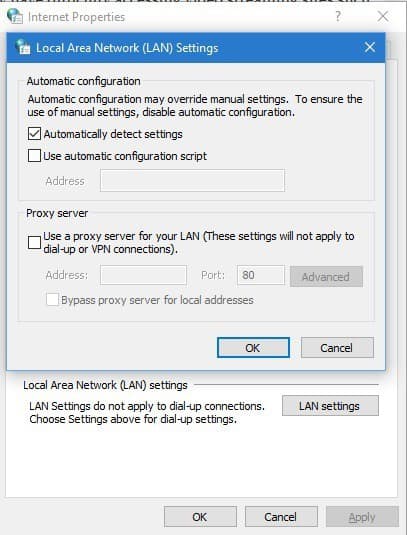
- This is the final step. There will appear your proxy settings. You could check whether it is okay or not.
Solution 2: Resetting TCP or IP
This is another solution for fixing the problem of proxy settings on your computer. Like the previous one, this too is a very easy process and could be done if you follow the steps written down.
- First thing first, you need to press the Windows key along with X. there will be a lot of options on your computer screen, you need to select the command prompt from that.
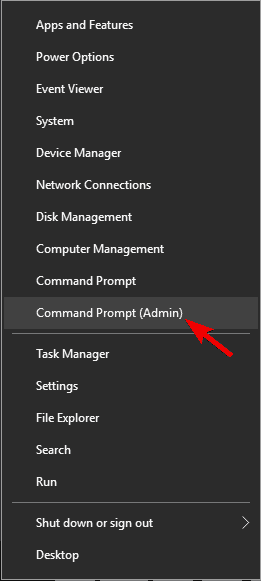
- After the selection of Command prompt, it will start running. Once it starts, you need to write there, nets hint IP reset resetlog.txt This is an important command.
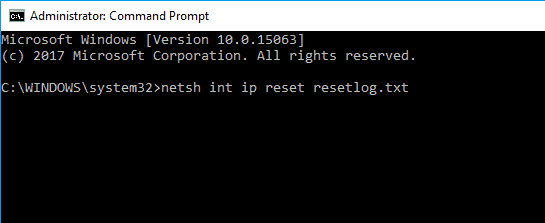
- Once the command is written and it starts working, you need to shut down your system. Restart it again. Now, check whether the problem is solved or not.
So, the process is very effective, but there is no guarantee, whether the problem will vanish completely after it. If the issue still persists after the completion of the process, then you either avoid it or download a tool that could fix it. There are a lot of such tools available, but one should be careful while choosing it. It should be tested. Download one, which could easily solve various problems like file loss, malware, hardware failure, etc.
Solution 3: Uninstalling the antivirus of your computer
The moment, you buy a new PC and start using it, you should install the anti-virus in it. To protect your PC from the bad elements, you need to have the Anti-virus in it. However, those using Windows 10, does not have to worry about it, because they get Windows defender pre-installed in it. This acts as an anti-virus even if you do not have one on your computer. The point that we are focusing upon, is that there are few of the anti-viruses that could cause a problem with the proxy. If you too are facing some problems related to it, it is advisory, to remove the anti-virus that is there on your computer.
Once you have uninstalled the anti-virus, check whether the problem is solved or not. If it is solved, then you need to download another anti-virus. This is by far the easiest method to be executed.
Solution 4: By restoring the system once
Out of all the process, this one is the most effective one. After the completion of this process, not just the issue of proxy settings would be solved, but there are other problems too that could be solved. The problem of proxy could be seen in the system, when you have installed a new application or if you have modified your network configuration.
In order to fix the problem by restoring the whole system, you need to follow the following steps.
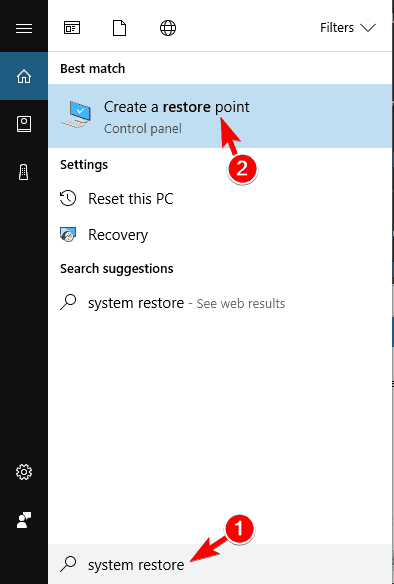
- At first, open up system restore. For that, you need to press, windows key and S together. Once it is opened, enter into it and click on the create a restore point from the options you get in the results.
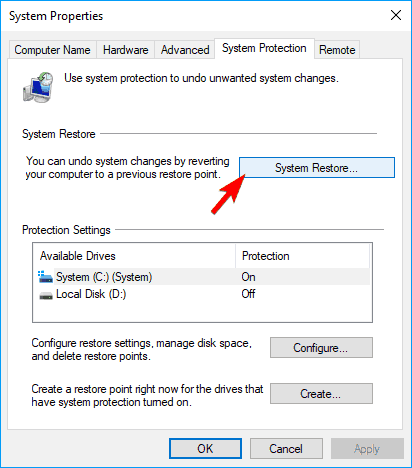
- The moment you select the option that is given previously, your screen will have system properties on it. You need to click on the system restore button.
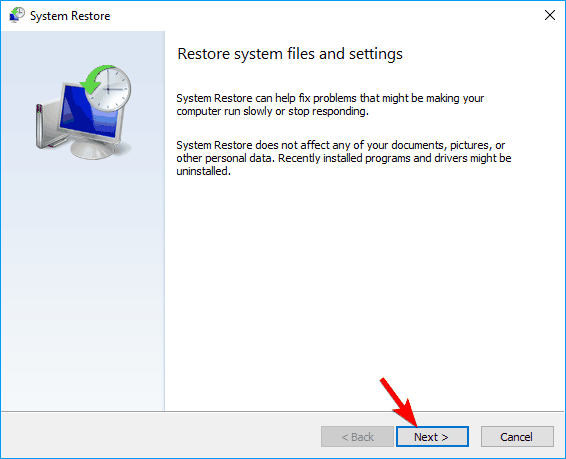
- After the opening up of system restore windows, click on the next button.
- There would be a list of a lot of restore points that were used recently. If you are not satisfied with the restore points that are there, you could go for the option, “show additional restores points”. After that, you could select your desired restore point and then could proceed further.
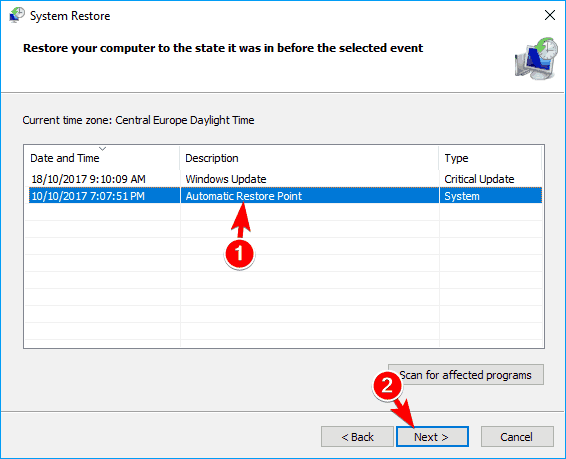
- This step would be your final step, you need to sit patiently and need to see the completion of the restoration process. The process could be completed with the help of the instructions that are there on the screen.
Once the restoration process is complete, the error will be resolved. It has to resolve, as in the beginning only we said that, this is the most effective methods for fixing up this problem.
Solution 5: Perform an SFC Scan
A lot of people out of their experience have suggested that running an SFC scan could solve the proxy problem that you are facing. It is assumed that this issue could be caused due to the corruption of a file. For fixing that particular file, one could do the things that are listed below.
- The first thing that you need to do is to open the command prompt.
- To open the command prompt, you need to press the Windows key along with the X key.
- There would appear a menu on your screen. Out of all the options that are there, select command prompt.
- After the selection of command prompt, write SFC or scanner and press enter after that.
- As soon as you finish the previous step, the scanning process will start. You need not interrupt in between the process; it might take 10-15 minutes to finish up.
As soon as the problem is solved, you need to see whether the problem is finished or not. If it is not solved yet, you need to do a DISM scan. This scanning process is very easy and the steps to do it are listed below.
- To do this step also, you need to open up the command prompt. The step to open it up is written above.
- Once you enter this option, you need to select the option of DISM or online or cleanup-image or restore health.
- After the selection of this option, press enter. The DISM scan will start.
This scanning process could take about 20 minutes to complete. You need to wait till then and do not interrupt in between. Once this scanning process is finished, you again need to check whether the problem is solved or not. If it is solved, then it is ok. If not, then you need to run the SFC scan again. There are a lot of users who have used this process and they have reported that the issue is solved after that. So, this one is a very effective process like the previous one.
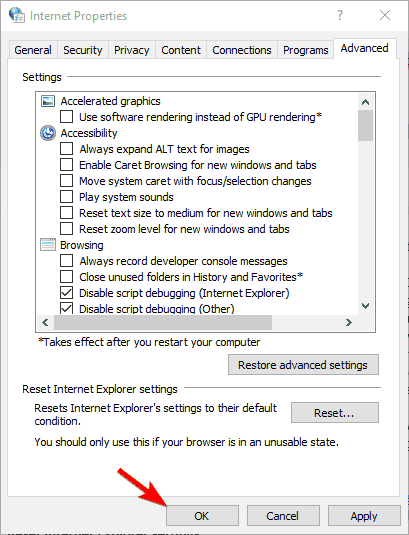
Solution 6: Resetting the internet settings
The error in the proxy setting could be detected in your system sometimes, because of the internet settings also. So, the best solution to fix this up is by resetting the network settings once. One should try setting their internet to default. In order to do so, you need to follow the steps that are written below.
- First, you need to press the Windows key+S. this shortcut will enable you to open the internet settings. You need to enter that and the menu that is there on your screen, you need to select the Internet options from there.
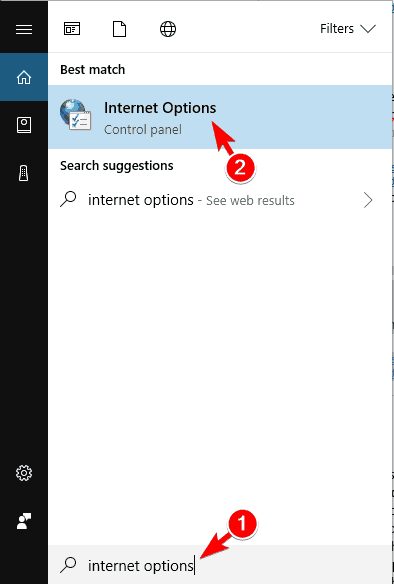
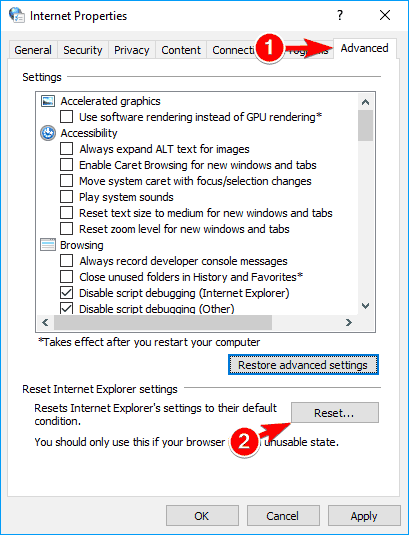
- Search for the Tab called advanced and then click on the reset button.
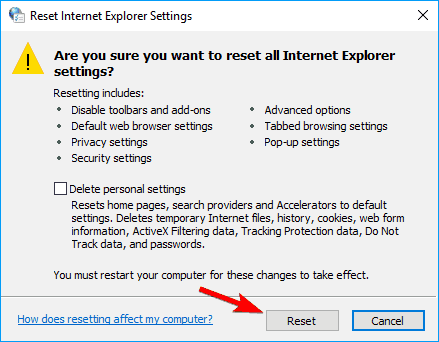
- If you wish to remove all your personal data from your system, then you could press the Delete personal settings.
- After this, you need to click on the restore advanced settings. However, this step is completely optional.
- The final step is saving the changes. For that, you first need to click on the apply button and then on the save button. Once you have reset the internet settings, your issue will be solved.
Solution 7: Restarting the network adapter
This method is by far the easiest and simplest methods to solve this problem. You simply need to restart your network adapter and the issue will be solved. For that, you need to follow the steps that are written below.
- You have to search for the network icon, first of all. Once you find it, right click on it. There would be a lot of options available on your screen, but you just need to choose the network and sharing center.
- Once the menu opens up, you need to click on the change adapter settings. This would appear on the menu on the left or right side.
- After finishing the previous step, you need to locate your network connection. Right click on it and select disable option.
- Again right click on the network connection and select the Enable option from the same menu.
Now, you need to restart your network adapter. Once the whole process is completed, the problem that you detected would be solved forever. The problem will be solved for now, but it might occur in the future too. Therefore, you should repeat this process time and again.
Solution 8: DNS settings
To solve the proxy issue in your PC, you need to do some changes in your DNS settings. In simple terms, you should enable the “obtain DNS server address automatically”. There are a lot of users that do this manually, but in order to dissolve the proxy issue, you need to change it manually. In order to do so, follow the steps that are written below.
- The first thing that you need to do is to open the network and sharing center. Once this menu will open up, you need to go to the option that says change adapter settings.
- Here, you need to locate your network connection. You need to right click on it and then select the properties from the menu that opens up.
- From there, choose the Internet Protocol Version 4 and again click on the properties.
- Now, there would be a lot of options on your screen. You have to select the Obtain DNS server address automatically option. There would be an option of doing it manually too, but you need to select the automatic one.
The moment you finish up this step, you are done. Check your system and you will see that the problem is resolved already.
Solution 9: Changing proxy settings
The problem is found in the proxy settings, so changing it might do the needful. Many users have done the following steps, in order to bring changes in the proxy settings.
- You need to open the settings app. for that, you either need to search it on your PC or you could simply press windows key with I.
- This shortcut will take you to the settings app. once the menu opens up, you need to search for the Network and internet and internet section.
- In the left pane, you will find the option of Proxy. In the right pane, you need to disable the automatically detect settings. This is the final step. Once it is finished, you are done.
According to a lot of users, this particular setting has solved the problem in such a way that, they have not experienced it again. If you find that this problem is appearing again, you need to do this again.
So, those were the 9 methods that could be done in order to fix, “Windows could not automatically detect network’s proxy settings” error. The steps that are mentioned here are really easy and could be done by anyone.
Table of Contents


