

Well, CNAME or Canonical name is one of the types of DNS records. With the help of CNAME one can use more than one name to point to a single host thus making it very easy to do things as host both a File Transfer Protocol server and a Web server on the same computer. It is only because of CNAME that the user can use a Web server to host certificate revocation list for certification authority as well as performing additional services. In fact, it is very easy and simple to add CNAME record in Windows DNS Server. Also the user can add as many CNAME as they want. It mainly depends upon the discretion of the user.
How to Add CNAME Record in Windows DNS Server

Steps to add CNAME record in Windows DNS Server:
Like the other DNS Server, the user can also create CNAME record as a static or dynamic record. The user can also create CNAME record either in forwarding Lookup Zones or on the Reverse Lookup Zones. But it should be remembered that CNAME record must always point to a host record or another CNAME record in forwarding lookup zones.
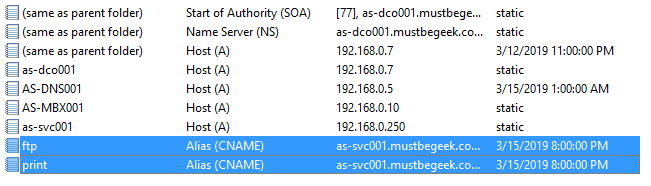
- Take for example AS-DCO001 is the main Domain Controller and also the DNS Server of the mustbegreek.com. The network administrator will add a new server AS SVC001 that will run several services at the same time by including FTP and print server. Keep it in mind that the A record for AS SVC001 is already in existence. Now if the administrator tries to use a more user-friendly one, then they can opt for other ones. CNAME can be added to the Windows DNS Server either by using DNS Manager or by using Power shell.
- The steps that are followed in adding record is somehow similar to add CNAME record. The user can start by selecting the zone that they want to use. In this case, you can use mustbegeek.com under the forward lookup zones. Please have a look at the below image and you will get a clear conception.

- Now right click on the zone name and then select new alias(CNAME)

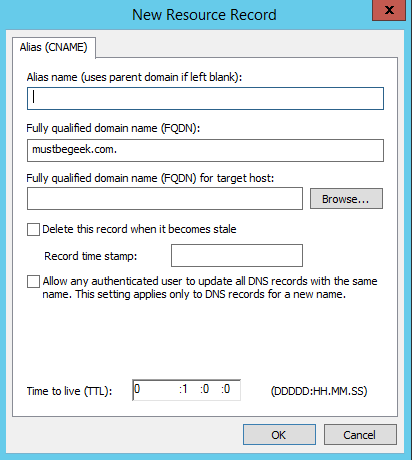
- The user will see that the window will show a message and by going through it the user should fill up the following things. First fill-up the alias name field with the help of the alias name. Note that the fully qualified domain name field will be automatically updated as the user will type the alias name. Next, fill up the FQDN target host field with the FQDN of the target host and click on the browse to select the form that is available on the records.
- The user can also choose to delete the record when it becomes a stale option. Once enabled, the option will convert the CNAME record into a dynamic record or else it will be static by default.
- Even the user can also tick and allow any unauthenticated user to update all DNS records with the same name in order to allow automatic update of the CNAME record if the information on the target record host is changing over time.
- On the other side, the user can also opt for modifying the TTL value if they want to use anything other than the default value that is for 1 hour. Below there are two images that may clear the whole thing in a systematic manner.

- In the next step, the user should click OK to finish adding the CNAME record.
Check here: How to Configure Stub Zone in Windows DNS Server
Add CNAME by using Power Shell:
When anyone is using power shell to add CNAME record in Windows DNS Server then they have to run the Power Shell as administrator. Soon after this, they can add comments below just like this.
Add-DnsServerResourceRecordCName -Name “ALIAS_NAME” -HostNameAlias “HOST_NAME_FQDN” -ZoneName “ZONE_NAME” [-AllowUpdateAny] [-AgeRecord] [-TimeToLive TTL_VALUE]
The user can replace the below with the information as the user want:
ALIAS_NAME: The user can replace it with the alias name in FQDN format.
HOST_NAME_FQDN: The user, in this case, should replace it with a target hostname also in the FQDN format.
ZONE_NAME: The user can replace with the zone name where the user can create the CNAME record.
(Allow update any): There is an optional keyword that serves the same function as allow any unauthenticated user to update all the DNS record
Age Record: There is an optional keyword that serves the same function as delete this record when it becomes stale.
Time to live: The optional keyword will serve the same function as the TTL field. It will simply replace TTL_ value with the value that the user desires. It should be in HH:MM: SS format. Just have a look at the below image and it will make the whole thing clear.

In short, CNAME has a very less requirement and the main thing that it demands is to have a valid Host A record for the target hostname. On the other side, the same alias name cannot be used for multiple times by different target host. CNAME is really a vital tool in the hands of modern people. The above-mentioned process adding CNAME record is quite easy and comfortable. The more people will use it the more they will get used to it. It may appear to be a tough process in the initial level but once the user enters into the process the whole thing becomes quite easier before them.
See more: Steps by Step Guide to Install VMware vSphere ESXi 6.7
Gone are the days of simple computer work. Today’s people mainly believe in fast and quality work. They can do anything to get quality and error-free work. The latest developments have reduced time to a great extent. Thus a person can concentrate on several projects at a time. It is really a very good thing. The wait is just over. Now it is the exact time when one can use the right tools and systems for getting their work done in a short duration. It should be appreciated by everyone.
Check here: Steps to Configure Aging and Scavenging in Windows DNS Server.
Table of Contents