
The process of Windows Audio Device Graph Isolation is the main problem that is often noticed at the time of running the task manager on the windows. But what is it and whether it is a virus? Many times it may consume excessive CPU memory. So in such a situation how can this problem be fixed. This is the problem that is often experienced by users. At the same time, it must also be noticed that the user is not playing the file in such a situation.
How to Fix Windows Audio Device Graph Isolation High CPU?

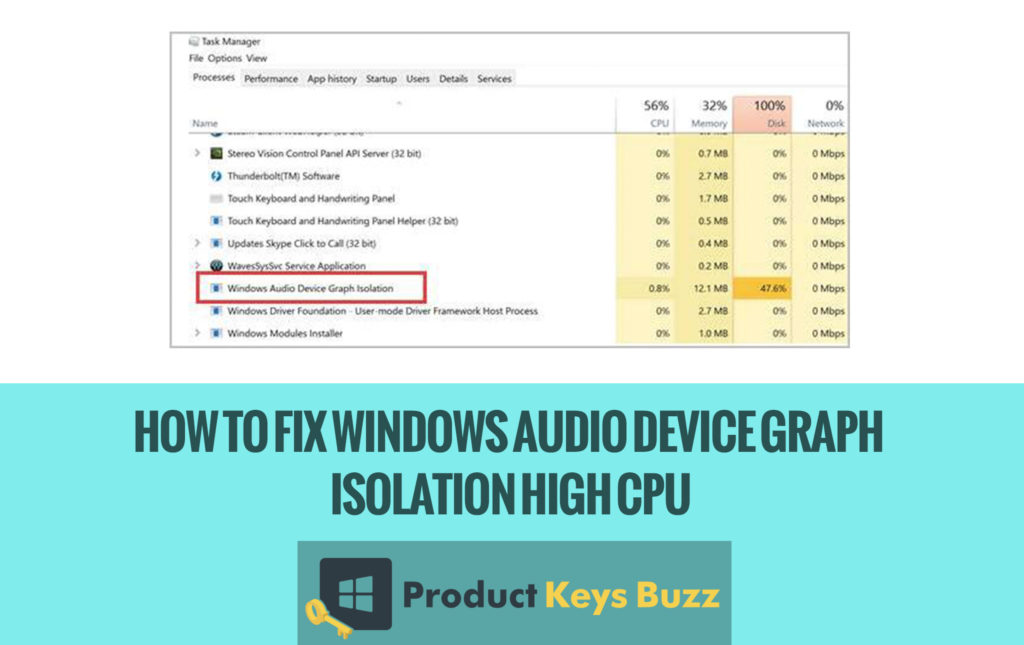
What does Windows Audio Device Graph Isolation actually mean?
It is actually the base of the windows audio engine. It mainly controls the windows sound enhancement process. It is also separated from the standard Windows Audio service. The separation process allows the developers of the sound drivers to insert their own audio effects without touching the Windows Audio service.
Moreover, there are some people who often face a problem with these types of sound enhancements due to the good use of system resources that mainly consumes the CPU usage
Is it really a virus?
Now the main question that mainly rises is whether it is a virus or not? It is basically a windows module and not a virus at all. This should be made absolutely clear. But one thing that is important is the virus can hack such items any time. But still, if you wish to check whether it is a virus or not, then there is a specific process for that. It can be followed step by step.
- At first right click on the Windows Audio Device Graph Isolation that is located on the Task Manager and then selects the Open file location option.
- The user will notice that the file is located on the C:\Windows\System32’ by the default name of Windows Audio Device Graph Isolation. Sometimes this process may show in the form of Audio.DG.exe.
- If the user finds that the file is located in a default position, then ensure that whether it is a virus or not.
See more: Windows Modules Installer Worker High CPU Usage Error in Windows 8 & 10
The main question that if it’s not a virus then what is the reason behind the consumption of hard drive CPU?
It may happen that the Windows Audio Device Graph Isolation may stop working immediately. Then all the users would try to find the actual reason behind it. One of the main reasons behind it is the poorly written audio enhancement drivers and the second thing is that it may easily consume a good amount of memory. There may be sound and often the sound alert may be crashed due to the above problem. There are some suitable means by which this issue can be fixed completely.
Steps to solve the Windows Audio Device Graph Isolation process to consume high CPU:
Here are some steps by which this problem can be solved completely. Let us try to find out some of them.
Solution:1 First, disable the sound effects properly:
Now let’s try to go through the steps in a systematic manner.
- In the first case right-click on the speaker icon that is located on the Windows taskbar. These are located in the bottom of the desktop screen bar and then select the playback devices.
![]()
- You will see that windows will open on the playback tab and then go to speakers and last on the properties.

- In the next step click on the enhancement tabs and check the box to disable the sound effects. Then simply click OK.
- If however, that option is not available, then step back to the sound dialog box and select the rest of the sound options.
- At last, disable the sound effects.
Read more: Complete Guide to Fix a “Rats! WebGL Hit a Snag” Error
Solution 2: Reinstalling the Audio driver respectively:
Another effective step to solve the issue is to uninstall the audio driver to reinstall the same. Here are the following steps that are required to be followed.
- First press win + R and then the user will notice the appearance of the Run dialog box.
- Now type devmgmt.MSc that is appearing on the dialog box and then click OK. It will help to open the Device Manager. On the other side, the user will also get the Open Device Manager from the Windows Control Panel.

- Next Right-click on the sound card device that is named and it will be seen that a context menu will pop up. Then select to uninstall it.
- Again confirm the uninstallation process by checking the box that appears beside the delete the driver software mainly for this device.
- Again click OK and then run the uninstallation process.
- Once the whole processes are finished, then restart your PC to see the changes effect. You will be glad to see the changes.
Read more: Step-by-Step Guide to Fix “pvp.net patcher kernel has stopped working”
Solution 3. Reinstalling Skype completely
There are many people who reportedly experience the problem of Windows Audio Device Graph Isolation at the time of using Skype. In such a situation the user should uninstall Skype completely from the computer and again reinstall it completely. However, it is always recommended to reinstall the latest and the most advanced version of Skype mainly from the official website. That will work in a much better way.
It is the main thing that is mainly included in the process and it should be observed strictly. Once the installation process is completed, kindly check if the problem has been eradicated completely. In the present world, Skype is mainly considered to be the main mode of communication between the two people. It is mainly observed as the main tool of communication incorporate business. That will be the best thing.
In all the cases, the following steps are just ideal and perfect. In fact, now the problem of Windows Audio Device Graph Isolation can be easily solved. No need to worry about the issues. It may even hamper the work during an emergency period. It is very much essential that the above-mentioned steps must be followed in such issues.
Read more: Complete guide on How to Fix WMI Provider Host high CPU usage
Table of Contents