
There are many organizations and companies in the world that mainly operate in a different environment and so they need to effectively manage and organizes their servers or accounts and other security policies to succeed. So obviously there is a requirement of a centralized and secured administrative mechanism. In short, Active Directory is actually an automated mechanism that provides a centralized solution for both the servers and the users. Take for example, whenever the user logs into a computer the Active Directory will verify the password that is submitted by the user. The umbrella of different identity-related services is Active Directory.
Complete Guide to Install Active Directory in Windows Server 2012

There is an Active Directory Domain Services within Active Directory that allows the Microsoft to:
- Manage and store the information in the administration level and also about the resources from the network.
- At the same time it also provides authentication and authorization mechanisms. Many times it also provides a framework to deploy other related services.
- In fact, Active Directory is a very important tool mainly for an organization that enables to efficiently manage its network resources. It performs a lot of important duties at the present time and thus has turned out to be an essential part.
In the following step we will mainly concentrate on the steps that are vital to install Active Directory in Windows Server 2012:
- Firstly, Active Directory can be installed through two methods, namely, installation of Active Directory by using the server manager through the Graphical User Interface and the second one is by installing Active Directory using Windows Power Shell or sometimes through Command Line Interface. In case the whole thing is done by the interference of Graphical User Interface then the user has to the first login to the server via administrator user.
- Next, open the server mainly from the task manager. Below is the picture that can make the whole scenario more clear and easy to understand.

- In the next step the user has to select and click on the Add roles and features from the server manager dashboard. Soon an Add roles and feature Wizards page will open and that will allow the modifications that need to be performed mainly on the Windows server 2012. The user has to now click next to proceed for the step. Please find below the image.

- Now the user has to select the role-based or feature-based installation option and click to the next button. At the same time, the user must also opt for the server selection tab and select for the server from the server pool and also select the server name. After doing so, the user should now proceed to the next tab server roles by clicking to the next button. All the steps are related to each other in a very unique manner. Even one is incomplete without the other. If the user somehow misses one step, then the next will be totally wrong and confusing.
- For the next step, the user has to opt to select the Active Directory Domain Services mainly from the server roles page and again click on the Active Directory Domain Services or AD DS. A window will open that will explain about the additional features that are mainly required to install the Active Directory Domain Services. Then click on the Add features.
- In the next step the user is directed to review on the features and select them accordingly. If it is done, they should click on the Next button. An image is being provided below for making the whole thing clear.

- The user is now requested to click on the Active Directory Domain Services and review all the information’s that has been provided on the current page. If done, please click to the next page. In this page the user should click on the install option to initiate the entire installation option.
- Soon it will be seen that the Active Directory Domain Services will be clearly displayed on the computer screen and the same will be displayed on the landing page of the server manager. Once the installation process is totally completed the user should click on the close button immediately to notice the changes minutely. Let’s have a view at the image provided below.

It is equally important to see that once the installation of Active Directory Domain Services is completed the server must be promoted as a domain server.
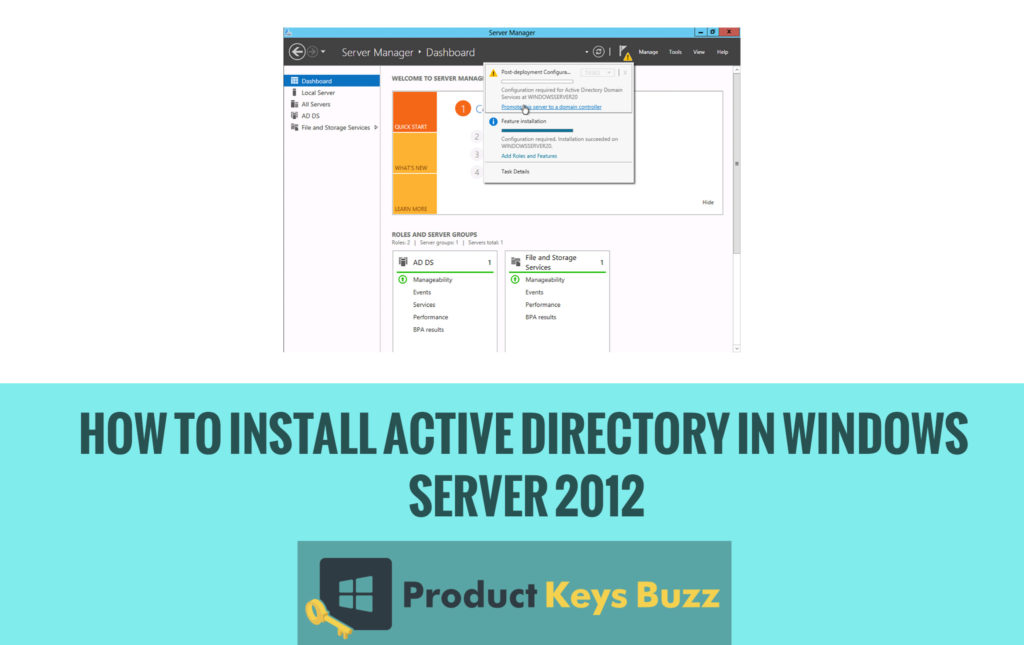
- In the first step, the user should server manager mainly from the task manager. The user will notice that there is a yellow icon on the top of the screen. It is better to click on the icon and also click on the option that will appear as “Promote this server to a domain controller”.
- In the next step, the user selects an add new forest option mainly from the deployment configuration tab. Then he should insert the root domain name into the root domain name field and go for the next option.
- Put the DSRM or Directory server restore mode password in order to confirm the same. The password applied is mainly used during the restoration of Active Directory. Once done click on the next tab.
- When the next tab is pressed a thing will appear on the screen that will ask for verification. The user has to simply verify it and enter the NETBIOS name of the domain. Now he should click for the next button.
- Here the user can see the exact location of the Active Directory database and also the log folders. It should be followed by clicking to the next option.
- Also, review the option carefully before opting for the next option. It should be done very seriously. A slight negligence can bring problems.
- It must be seen that all the pre-requisites needed must be checked by the system. The moment it is done the user should go for the next option and click on the install option.
- Now the user should be very happy and pleased upon installation of the Active Directory. It is now almost done.
At the same time, power shell command or command line is a very active tool for performing and managing the Windows components installation in the automation of tasks.
So in short, both the above-mentioned methods are equally important for installing Active Directory especially in Windows 2012. It is also important to note that importing of Active Directory Domain Services is done in the power shell session actively. If, however, there is any issue regarding the performance of the work it is better to contact the consultants who are quite experienced in this sector. They can guide you actively.
Read more: Complete Guide to Fix Microsoft Compatibility Telemetry High Disk Usage