Fix “This app can’t run on your PC” on Windows 10: Windows 10 is one of the most used OS by the windows lovers. If you too are using it, you may have received a message saying, “this app can’t run on your PC”. Well, there are a lot of solutions that could be used for fixing this problem. We are listing them one by one in the section below.
By creating an administrator account
According to a lot of windows users, this is a message they get when they try to open the basic windows applications like task managers. Now, when the experts were asked about this problem, then they said that this may be because of some problem in the user’s account. To solve it completely one could create a new account. The steps to create a new account are given below.
- The first thing that you need to do is to go to the settings. After that search for accounts. Under this section, you will get a category of family and other users.
- Search to the option of other users and there you will find the option of “add someone else to the PC”. You have to click on this option.
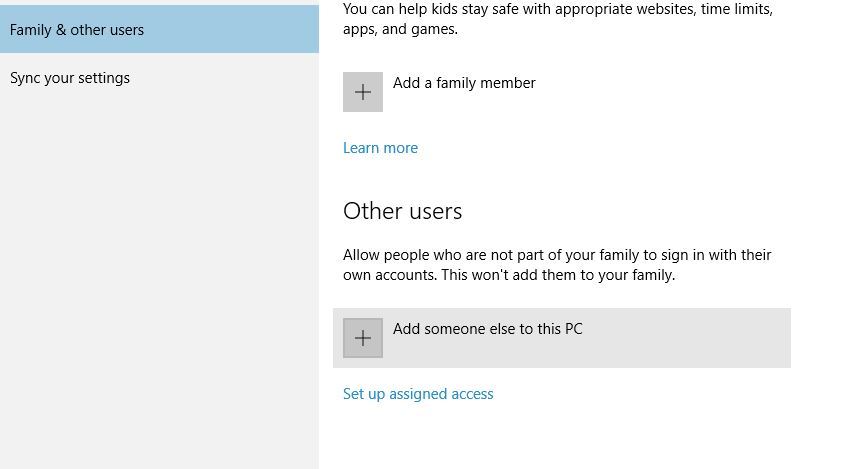
- After you have clicked on the option that has been mentioned in the previous option, you will see that a new message called “I don’t have this person’s sign in information”. You need to click on that.
- There choose the option to add a user without a Microsoft account. After this, you will see that the option of filling up your details has appeared on your screen.
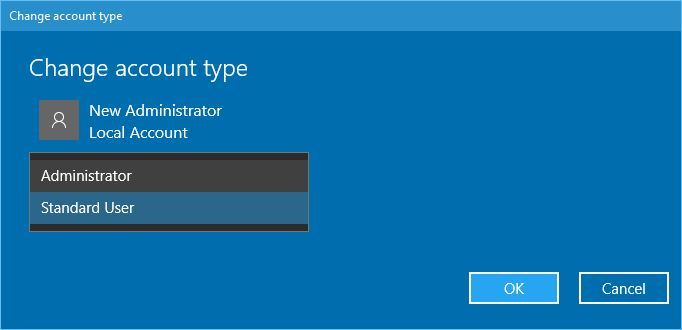
- There, write down the name and password of the new administrator account that you want to create.
- In the other user section, you will see that there is a new account available. Select that and click on the option of “select account type”.
- In the final step, you need to choose the administrator. Click on ok and you are done.
Once you have created this new account of yours, you will see that your problem is fixed. The message “this app can’t run on your PC” won’t come anymore. Once it is confirmed, you need to transfer all the files and important data of your old account to this account and you need to use this one only.
Read more: Complete Guide to Fix Microsoft Compatibility Telemetry High Disk Usage
Disabling the smart screen
If we talk about the working or characteristics of windows 10, then the smart screen is something that all the user’s love about this OS. However, it has been seen that the smart screen feature has created a few problems. These problems lead to the message like “this app can’t run on your PC”. So, to fix this problem, you will have to disable smart screen, if you are using it. It is a very easy process and the steps involved in it are given below.
- You need to enter into smart screen first. For that, press, Windows key+ S. this shortcut will enable you to enter smartscreen. After entering it, select change smart screen settings. This is an option that comes in the results.
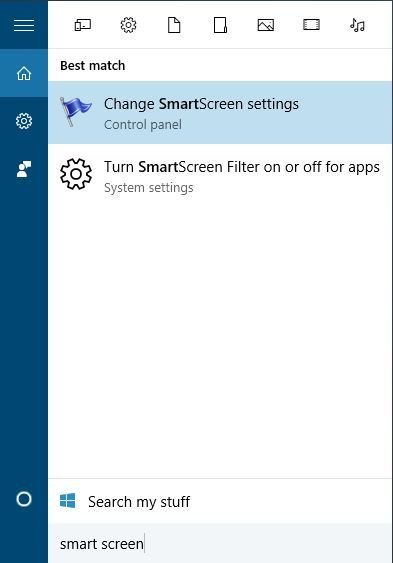
- After that, you need to go to the security section. There, search for Windows Smart screen. Once you find that, select it.
- There, you have to choose the option of “change settings”. There, you will get a lot of options. You just need to select turn off windows smart screen. After that, click on ok. This will save the changes that you have made.
Read more: Windows Modules Installer Worker High CPU Usage Error in Windows 8 & 10
Enabling app side-loading
This is one more thing that could help you in getting rid of this problem. If you do not know how to enable app side-loading, then here are the steps that you need to follow.
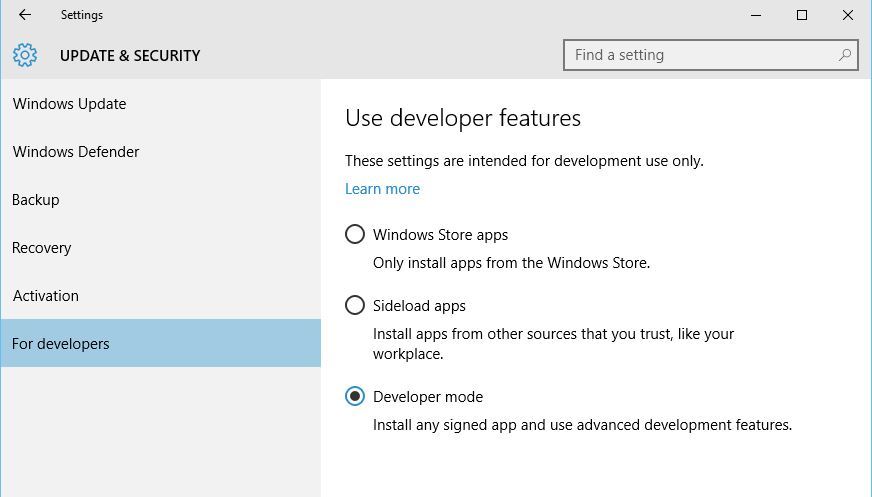
- The first thing you need to do is to open the settings and then search for update and security section.
- Then after, you need to search for “for developers” tab. Once you click on that, there will be a lot of options in front of you on your PC’s screen. Now, you just have to select the developer mode. In this category, you need to select the “use developer features”.
Making a copy of the file that one needs to run
If you look clearly to the message that you receive, then it says “this app can’t run on your PC”. Now, one thing that you need to understand here is that this is an error related to the application. So, you have to pay attention to the way in which the applications are opening. If there is a certain application that is causing this problem, then you should make a copy of that then save it. If you are not aware of the way in which you could do it, then follow the steps that are written below.
- For this, the first thing that you need to do is to select the .exe file of the application that you want to run on your PC. Type Ctrl+C and Ctrl+V.
- Just after that, you will see that a new .exe file is created.
- Try to run this file on your PC. Also, check whether there is any problem in running it or not.
If the issues still persist in this application, you need to avoid this particular application in the future.
Read more: 5 best tune-up utilities for Windows 10
Updating the store
Another alternative that one should use for fixing this problem is the update of the windows store. The problem that you are facing in your PC might be because of the bug that is created in the version of the store that you are having on your PC. In order to fix this one needs to update the windows store. Follow the steps that are written below to update your Windows store.
- Go to the start menu and open the Windows Store.
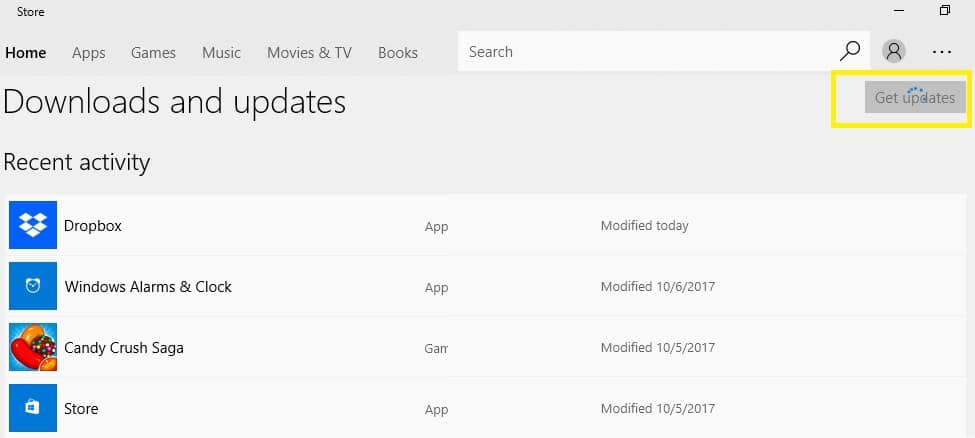
- Once you will open the store, you will see that there is a menu with 3 dots. This will be located on the upper right-hand side corner.
- After opening that particular menu, you will see that there is a lot of options. From that list of options, you need to select the Downloads and updates.
- Once you select the previous option, again a lot of options would be there. You need to click on the “get updates” options.
Disabling the VPN or proxy
Sometimes, the proxy or VPN settings block the outgoing connection of the Microsoft Store servers. If this is the reason for which your PC is getting the problem of the application, then you should disable the VPN or proxy settings. To know the method of doing so, you need to follow the following steps.
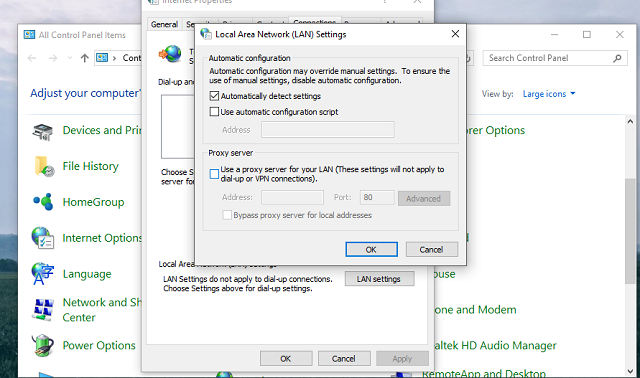
- The first thing one needs to do to get started with this process is to open the control panel. To open the control panel, you need to right click the start menu. After that, straight away open the control panel.
- Now, out of all the options, click on the internet.
- Under this category, you will find an option saying connections. You need to click on that.
- After that, select the LAN settings.
- In this category, you will find the option of Use a proxy server. A box will be there. You need to uncheck that box.
- Once the previous step is done, you need to confirm or save the changes. After that, try and log in again.
So, these were the steps that you need to follow before you turn off your VPN. Once done, turn off your VPN settings. After that, try to launch the store once again. So, if a certain application or a set of applications are not running on your PC due to the problems that are caused by the VPN or proxy settings, then you should follow these steps, in order to fix it.
Repairing the registry might work
According to the tech advisors, the registry keys that are corrupt or faulty could prevent the running of the applications on your PC. You really need to check whether this is the problem or not. If this is the problem behind your problem, then you will need a tool that could help you in recovering from the problem. There are a lot of such tools available online. You could try using them. Always remember, that for good and secured results, you need to use a good tool and before using them, you need to back up your registry. This is an important thing to do, as it would act as storage if anything goes wrong.
Along with that, you could also use Microsoft System File Checker. It is also capable of checking the corruption of the files. The process that is done to find the corrupt file is called System File Corruption Scan. To do the scan, you need to do the things that are listed below.
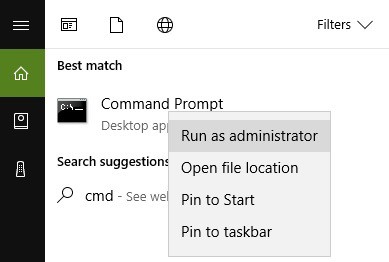
- First thing first, go to the start menu. There, you need to type cmd. The command prompt will appear. You need to right click on it. Once that is done, you will see that there is an option called to run as administrator.
- Once you have finished doing the previous step, you need to type can now command.
- This is the last step. The moment you will type the previous command, the scanning process will start automatically. You need to wait until this procedure is finished.
- Once the process ends up, restart your computer. In this reboot process, all the keys that are corrupted will be lost.
Read more: How to uninstall Edge in Windows 10
Finding the errors in the disc
The disc is an important part of the computer. There are cases where the certain application is not running on the PC because there was some problem in the disc. Now, if you want to be sure about it, you need to check your disc to find the errors. Once you will check the disc, you will be able to find whether there is any error or not. If you find errors in it, then you should take steps in order to resolve the problems. It is very easy to run a disc check on Windows 10. Here are the steps.
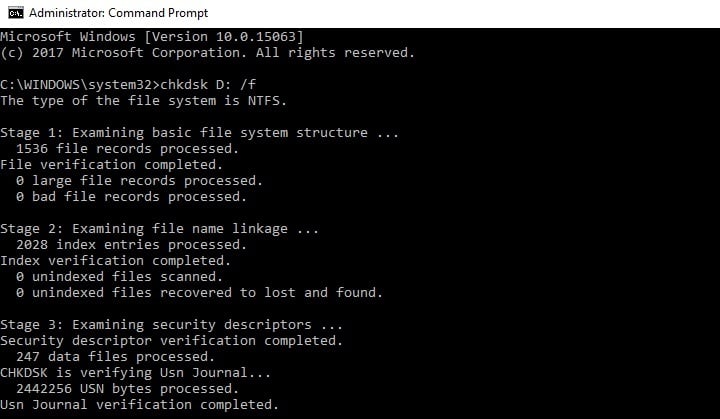
- First thing first, the command prompt should be started, as administrator. After that, you need to write chkdsk C:/f command. Press enter afterward.
- You should know what the letter of your hard drive partition is. This is because you need to replace the letter C from that letter.
- One should never forget to use the /f thing. If you do not use this letter in your command, then the disc will be scanned, but the repairing won’t be done. With the use of this /f, the disc will locate the error and they will repair it too.
- If you find that there are physical issues too in the disc, then you need to run the /r parameter, in order to get rid of them.
Clearing the browser cache
All the reasons that are mentioned above are responsible for the application that is not running on your PC. Along with them, if you have stored a lot of browser cache on your PC, then also the problem may come to you. So, it is always advisory, that you keep cleaning your browser cache. If the browser cache is stored, then the whole download process gets corrupted and because of that, the files that you wish to have on your PC does not download properly.
To get rid of this problem, you need to clear the cache of your browser and then remove the app that is causing the problem. Re-download and Re-install it. To remove or delete the cache stored you could use a tool. If not, you could go to the official page of the browser’s developer.
These were all the methods that could be used if a certain application is not running properly on your PC. We have mentioned 9 methods altogether and one could use any of them according to their convenience and comfort.
Read more: How to Fix: Bluetooth is not working in Windows 10
Table of Contents


